Apache/Tomcat 8 Uniface Migration Guide
1. Introduction
This guide describes the procedure for upgrading Apache Tomcat 8, as installed with an existing Uniface 9.x or 10.x installation, to Apache Tomcat 8.5 or 9. This guide currently only focusses on Windows.
1.1 Assumptions
In this guide, we make the following assumptions:
- The current configuration does not deviate very much from the default Uniface installation, meaning the directory structure has not changed.
Note: Any alternative configurations and add-ons to Tomcat 8 should first be listed and addressed before continuing to the Uniface-specific migration. - The upgrade will be to Tomcat 8.5 or Tomcat 9.
- The current version of Apache Tomcat is installed on a Windows system.
1.2 Resources
Additional resources:
2. Procedure
Before continuing, please read the migration guides provided by Tomcat and check if there are specific settings that require attention: https://tomcat.apache.org/migration.html
2.1 Install and test the new Apache Tomcat version
Tomcat versions 8.5 and 9 both contain a file called RUNNING.txt in the binaries root directory. It describes the installation process in more detail. We recommend that you read this file because it provides greater detail on the installation and workings of Tomcat. Relevant parts from this guide are used in this document.
Prerequisites
- Download the core binary distribution of Tomcat 8.5 or 9 for Windows from the location mentioned under 1.2 Resources.
- Unpack the binary distribution zip file in <UNIFACE_INSTALL>\common\, and make sure the original directory structure is maintained.
Note: This is the default when installing Uniface, but it can be any preferred directory.
Setup JRE (from RUNNING.txt)
If your current JRE matches the Tomcat installation requirement, you can skip this step. Java installations are typically found in <PROGRAM_FILES>\Java
- Download and Install a Java SE Runtime Environment (JRE)
- Download a Java SE Runtime Environment (JRE), release version 8 or later, from http://www.oracle.com/technetwork/java/javase/downloads/index.html
Note: Make sure the JRE version has the same architecture as tomcat, so if tomcat is 32bit, make sure JRE is also 32bit and so on.
- Install the JRE according to the instructions included with the release. You may also use a full Java Development Kit (JDK) rather than just a JRE.
2.2 Configure Environment Variables
RUNNING.txt section 3 contains detailed information about environment variables for Tomcat. It is recommended that you read this section carefully and follow its recommendations.
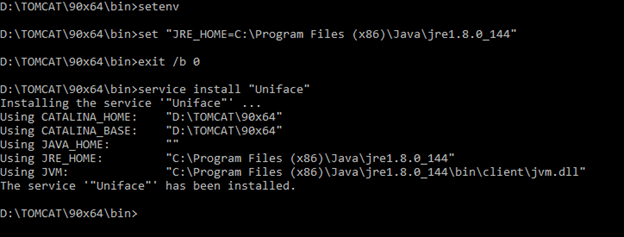
However, if you choose to use the startup script logic mentioned in RUNNING.txt, section 3.1, you should at least set the path to JRE as an environment variable:
- Open a text editor and add the following lines:
set "JRE_HOME=<PROGRAM_FILES>\Java\<JRE>"
exit /b 0
where <JRE> is the installed JRE version.
Note: it is recommended to save the existing version of the var JRE_HOME in a separate .bat file in order to easily switch back to the original situation.
- Save the text file as setenv.bat in <TOMCAT_INSTALL>\bin.
2.3 Install the Tomcat service
You are now ready to install the Tomcat service.
- Open a command prompt and execute the command
cd <TOMCAT_INSTALL>\bin
2. Execute the command:
setenv.bat
Execute the command
service.bat install "Uniface"
This will install the Tomcat service with the name Uniface and display name Apache Tomcat <version> Uniface.
Note: The display name for the service can be changed by editing service.bat. Look for :
set DISPLAYNAME=Apache Tomcat (version) %SERVICE_NAME%
Open the windows services and note that the service is installed:

Open <TOMCAT_INSTALL>\conf\server.xml and change all port numbers that start with 8 into 9, for example:
<Connector port="9080" protocol="HTTP/1.1" connectionTimeout="20000" redirectPort="9443" />
We will change this back once the new service is ready, but this will ensure the new service can run beside the existing Tomcat8 service. See chapter “3.4 Finalize the installation”.
Right click the “Apache Tomcat 9.0 Uniface” service and click start. This should start the service, which should then have the status ‘running’ (after refresh) in de Services view.
2.4 Test the Tomcat service
After startup, the default web applications included with Tomcat will be available by visiting:
http://localhost:9080/

3. Uniface configuration
This section describes how to get the Uniface WRD and any existing applications to work with the new Apache Tomcat installation. It is assumed that there is already a working Tomcat installation available on the system, so that you can duplicate the configuration.
Before you start, we recommend that you stop the service Apache Tomcat <version> Uniface which we just created in the previous chapter.
3.1 Install the WRD classes
- Open a File Explorer and go to
<UNIFACE_INSTALL>\common\tomcat\lib - Locate the wrd.jar file and copy it to
<TOMCAT_INSTALL>\lib
Note: Alternatively you can also move the wrd.jar to <UNIFACE_INSTALL>\uniface\webapps\WEB-INF\lib
3.2 Review the Uniface configuration
uniface.xml
Copy the file uniface.xml in
<UNIFACE_INSTALL>\common\tomcat\conf\Catalina\localhost\
to
<TOMCAT_INSTALL>\conf\Catalina\localhost\
This file contains the location of the Uniface application (and \WEB-INF\web.xml) which typically resides in
<UNIFACE_INSTALL>\uniface\webapps\uniface
The content of this file should look something like this:
<?xml version="1.0" encoding="ISO-8859-1"?> <!-- Context configuration file for Uniface --> <Context docBase="<UNIFACE_INSTALL>\uniface\webapps\uniface">
<Valve className="org.apache.catalina.valves.AccessLogValve" prefix="uniface-" suffix=".log" pattern="common"/>
</Context> |
|---|
3.3 Review customized configuration files
The previous two steps (3.1 and 3.2) are basically the only two steps that need to be taken in order to make Uniface work under the new version of Tomcat. However, depending on your local situation, there may be custom configuration implemented apart from the Uniface mandatory configuration.
Relevant configuration files can be found in the <TOMCAT_INSTALL>\conf directory:
- catalina.properties
- catalina.policy
- context.xml
- tomcat-users.xml
- logging.properties
- web.xml
We recommend that you use a tool such as BeyondCompare (https://www.scootersoftware.com/download.php) to compare the content of the files between Tomcat8 and the new Tomcat version.
Note: server.xml also falls under this category, however, we’ve modified it in a previous step to allow the new service to run alongside the old service, and will be edited in chapter “3.4 Finalize the installation”
3.4 Finalize the installation
At this point the new tomcat service is ready to start using the new Uniface configuration.
Testing
- Start the service “Apache Tomcat <version> Uniface” and make it is running by refreshing and verifying the status (‘running’)
- Open a browser and go to the URL http://localhost:9080/uniface/wrd/<DSPNAME> to check if the application works as expected.
Restore server.xml
- If all works as expected, stop the “Apache Tomcat <version> Uniface” service and open server.xml in order to set the port numbers back by comparing it to the Tomcat8 server.xml configuration and save the file.
- Stop the existing tomcat8 service and start the “Apache Tomcat <version> Uniface” service. The Uniface application now runs under the new Tomcat version.
- Open a browser again and go to the URL http://localhost:8080/uniface/wrd/<DSPNAME> and verify that the application now also runs under port 8080 (or you custom port)
Cleaning up
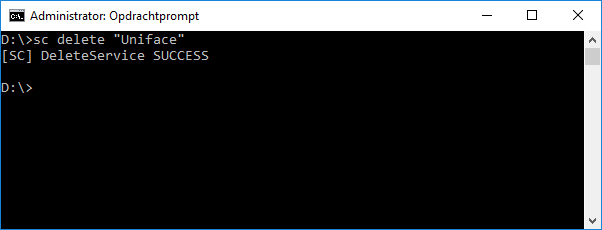
Before removing the tomcat8 binaries, remove the service:
- Open a command prompt as administrator
- Execute the command:
sc delete “tomcat8_service_name”