Environment
EXTRA! X-treme version 9.1 and higher
Situation
This technical note describes how to use the "hyperlink" startup dialog box available in EXTRA! X-treme 9.1 and higher.
Resolution
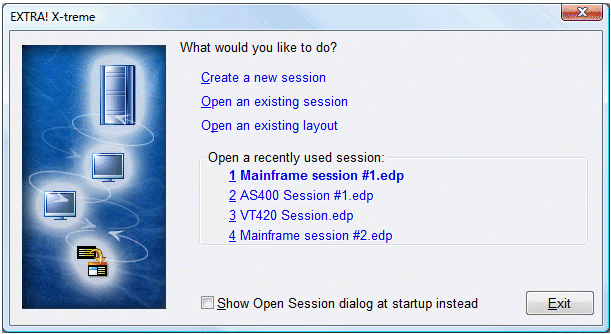
Beginning in version 9.1, when you start EXTRA!, a startup dialog box provides several options for opening sessions. Sessions that you accessed most recently are available through hyperlinks and hotkeys (underscored letter or number). This hyperlink dialog increases user efficiency, since you can skip the Open Session dialog and browsing through all your saved sessions.
Figure 1. Hyperlink Startup Dialog
To select a hyperlink option, do one of the following:
- Click on the option using the mouse,
- Press the underlined hot key (displayed when you press the Alt key), or
- Navigate using the Tab or up/down arrow keys, and press the spacebar or Enter key.
If you have not yet opened or created a session, "Create a new session” is the default hyperlink. If you previously saved or opened sessions, they are displayed under "Open a recently used session," and the most recent session is the default hyperlink.
Hyperlink Tooltips
The hyperlinks for the recently used sessions have popup tooltips which display the full path to the session file. To see the tooltip, hover the mouse cursor over the hyperlink for a few seconds. If you have multiple recent sessions with the same name, use the path information to distinguish between them.
Removing Recent Sessions
You can remove a session from the recent session list by right-clicking the session name and selecting “Remove from list” from the context menu. The session can be added again by opening it in EXTRA!
Adjusting the Number of Recent Sessions
You can adjust the maximum number of sessions listed under "Open a recently used session" or disable the feature completely. See KB 7021790 for details.
Startup Dialog Box Alternatives
If you prefer, you can configure EXTRA! to display the Open Session dialog box or the legacy EXTRA! startup dialog box when you launch EXTRA!
Show Open Session Dialog Box at Startup
To configure display of the Open Session dialog box when EXTRA! launches:
- In the hyperlink startup dialog, select the "Show Open Session dialog at startup instead" checkbox.
- Open an existing session from the list. Note: If you select a different option, the changed preference is not saved.
To re-enable the hyperlink startup dialog box:
- Start an EXTRA! session and click Options > Global Preferences.
- Clear the "Show Open Session dialog at startup instead" checkbox and restart EXTRA!
Restoring the Legacy EXTRA! Startup Dialog Box
To display the startup dialog box with radio button controls from version 9.0 or earlier, as shown below, you must edit a registry value.

Figure 2. Radio Button Startup Dialog
Warning: These instructions should be carried out by a user with Administrative rights to the PC and who is familiar with registry manipulation tools. Proceed with extreme caution when editing the Windows Registry and use the Registry Editor at your own risk. It is critical to back up the Registry before you proceed. For full details and warnings regarding editing the Windows Registry, see Microsoft Article 256986: https://docs.microsoft.com/en-US/troubleshoot/windows-server/performance/windows-registry-advanced-users
To configure the setting for the current user, use RegEdit to set the following registry value:
Type: DWORD
Value Name: ShowHyperLinkOpenDlg
Value Data: NO
To configure the setting for all users, a value can be set in the machine area of the system registry:
Type: DWORD
Value Name: ShowHyperLinkOpenDlg
Value Data: NO
The value will be copied to the user area of the registry the first time a user runs the version 9.1 application (or after the user’s EXTRA! subkey has been removed).
Deploying the Registry Value
The version 9.1 Custom Installation Wizard does not support creating an installer transform file (*.mst) for the ShowHyperLinkOpenDlg registry value. Use the following steps to create a transform file using the Microsoft Orca MSI Editor instead:
For more information about Orca, see https://docs.microsoft.com/en-us/windows/win32/msi/orca-exe
- MSI\\Atmee91.msi: This file is approximately 45 MB in size, which includes the compressed program files. It can be copied and run from other folders.
- EXTRA!\\Atmee91.msi: This file is approximately 3 MB in size. It must be run from the folder containing uncompressed setup.exe and program files to install.
5. In the Tables (in the left pane), select Registry.
6. In the Edit menu, click Find and enter ShowHyperLinkOpenDlg.
7. Edit the entry in the Value column to NO.
8. In the Transform menu, click Generate Transform and enter a name.
9. Apply the transform to Atmee91.msi by running the following command:
msiexec /i ATMEE91.msi TRANSFORMS=<transform_name>.MSTwhere <transform_name> is from step 8 above.
After installing the transformed Atmee91.msi package, verify the ShowHyperLinkOpenDlg value has been successfully installed in the registry.
Legacy KB ID
This article was originally published as Attachmate Technical Note 2465.
Full article: https://portal.microfocus.com/s/article/KM000002838
#Extra!
#SupportTips/KnowledgeDocs


