


This article is a tutorial to supplement the documentation that is supplied with Enterprise Server. It shows how to get started with some of the Docker demonstration files that are supplied with Enterprise Server in order to run a CICS application in a Docker container on Linux.
Overview
This tutorial shows how you use the Docker demonstration files supplied with Enterprise Server to create an image containing Enterprise Server and a sample CICS application, run that image in a Docker container, and connect to the container in order to run the demonstration application and view and configure the enterprise server used to run it.
The tutorial assumes that you are using the following:
- Enterprise Server 5.0. If you are using Enterprise Server 4.0 the steps in the tutorial should be the same but you will need to change the names of some of the files used to reflect the different version number.
- SUSE Linux. If you are using Red Hat Linux, relevant information is provided where appropriate.
Prerequisites
Before starting this tutorial you must have the following software installed and working successfully:
- Docker
- A 3270 emulator
You must also have available the following:
- An appropriate license (.mflic) file for using Enterprise Server in a Docker container.
- The file ent_server_dockerfiles_5.0_suse_x64.tar. This contains the two Docker demonstrations for Enterprise Server which are used in this tutorial.
Note:On Red Hat Linux, the name of the file you need is ent_server_dockerfiles_5.0_redhat_x64.tar.
You should have received these files when you received your Enterprise Server installation information and media.
Outline
The steps covered in this tutorial are:
- Create a working directory and populate it with the files you will need to complete the tutorial.
- Create an Enterprise Server base image.
- Create the Enterprise Server demonstration application image.
- Run the Enterprise Server demonstration application image.
- Stop the demonstration application and tidy up.
Create and Populate a Working Directory
This section lists the files that you need to have available before starting to create the CICS demonstration application. It also describes the directory structure that the various files need to be in in order to be able to use some of the shell scripts that are supplied with Enterprise Server. Using these shell scripts greatly simplifies the process of creating the CICS demonstration application images.
- Ensure that you have the relevant files:
- An appropriate license (.mflic) file for using Enterprise Server in a Docker container.
- The file ent_server_dockerfiles_5.0_suse_x64.tar. This contains the two Docker demonstrations for Enterprise Server which are used in this tutorial.
- Create a working directory to hold these files and change directory into it. This tutorial uses /home/user/ES_DockerTutorial.
- Copy ent_server_dockerfiles_5.0_suse_x64.tar into the current directory.
- Unpack the contents of ent_server_dockerfiles_5.0_suse_x64.tar.
This creates two directories (/home/user/ES_DockerTutorial/EnterpriseServer and /home/user/ES_DockerTutorial/Examples) and two readme files (README.html and README.txt).
- Copy the .mflic file to the /home/user/ES_DockerTutorial/EnterpriseServer directory.
Create the Enterprise Server Base Image
Now that you have all the required files in place you're ready to create the Enterprise Server base image.
The Docker demonstration for the Enterprise Server base image includes a shell script to make creating the base image as easy as possible:
- Change directory to the directory containing the Docker demonstration for the Enterprise Server base image:
cd /home/user/ES_DockerTutorial/EnterpriseServer
- Run the shell script specifying a parameter to indicate that you accept the Micro Focus End User License Agreement:
./bld.sh IacceptEULA
The shell script takes a while to run, but when it finishes you will have an Enterprise Server base image and an interactive login version of the base image, as indicated by the output from the shell script:

|
Note:
|
Create the Enterprise Server Demonstration Application Image
You're now ready to create the image for the Enterprise Server demonstration application. This involves creating a new image that is based on one of the Enterprise Server base images that you have just created and extending it by including a supplied CICS demonstration application.
The Docker demonstration for the CICS demonstration application includes a shell script to simplify this step:
- Change directory to the directory containing the CICS Docker demonstration:
cd /home/user/ES_DockerTutorial/Examples/CICS
- Run the shell script without any parameters:
./bld.sh
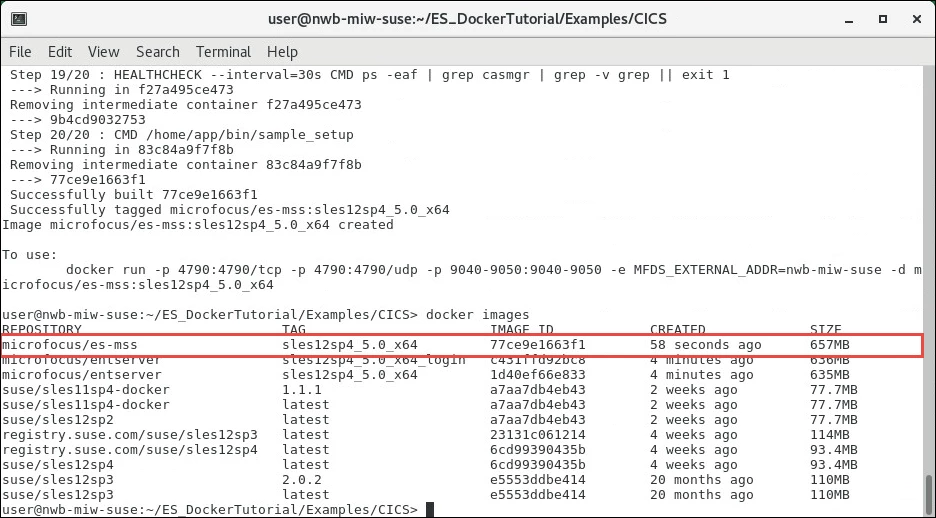
Again, the shell script takes a while to run. When it finishes, the created image is listed, as are brief instructions on how to run the image:

Note:If you are using Red Hat Linux, the name of the image created would be microfocus/es-mss:rhel7_5.0_x64 instead of microfocus/es-mss:sles12sp4_5.0_x64.
- Execute the following command:
docker images
This lists the available images so you can confirm that the new image is present:
Run the Enterprise Server Demonstration Application Image
You're now ready to run the Docker image for the CICS demonstration application:
- Enter the following command to run the image:
docker run -p 4790:4790/tcp -p 4790:4790/udp -p 9040-9050:9040-9050 -e MFDS_EXTERNAL_ADDR=host-name -d microfocus/es-mss:sles12sp4_5.0_x64
where host-name is the name of the host on which the container will be running. This was displayed when the shell script to build the Enterprise Sever demonstration application finished, and in this tutorial is nwb-miw-suse. For example:
docker run -p 4790:4790/tcp -p 4790:4790/udp -p 9040-9050:9040-9050 -e MFDS_EXTERNAL_ADDR=nwb-miw-suse -d microfocus/es-mss:sles12sp4_5.0_x64
Note:If you are running on Red Hat Linux, the name of the image to specify in this command would be microfocus/es-mss:rhel7_5.0_x64 instead of microfocus/es-mss:sles12sp4_5.0_x64.
- Find the information you need to be able to connect to the running container with a 3270 emulator.
To connect to the container you need to know its IP address, and to find the container's IP address you need to know its ID.
- Find the container's ID by entering the following command:
docker ps
A list of running containers is displayed. In the list shown below, the container ID is 47a998fdbcc5.

- Find the container's IP address by entering the following command:
docker inspect container-ID --format="{{range .NetworkSettings.Networks}}{{.IPAddress}}{{end}}"where container-ID is the ID that you found in the previous step.
For example, the command for the container shown in step 2a, with ID 47a998fdbcc5, is:
docker inspect 47a998fdbcc5 --format="{{range .NetworkSettings.Networks}}{{.IPAddress}}{{end}}"and the result from this command is shown below:
 The returned IP address in this case is 172.17.0.2.
- Find the container's ID by entering the following command:
- Connect to the running container using a 3270 emulator, specifying the IP address of the running container and port number 9040.
The connection is made to the running container and you see a CICS signon screen similar to the following:

- Run the ACCT transaction:
- Log in to the CICS region by specifying SYSAD for both USERID and Password.
- Clear the screen. How you do this depends on the 3270 emulator software that you are using.
- Enter ACCT.
The demonstration application starts and you see a home screen similar to the following:
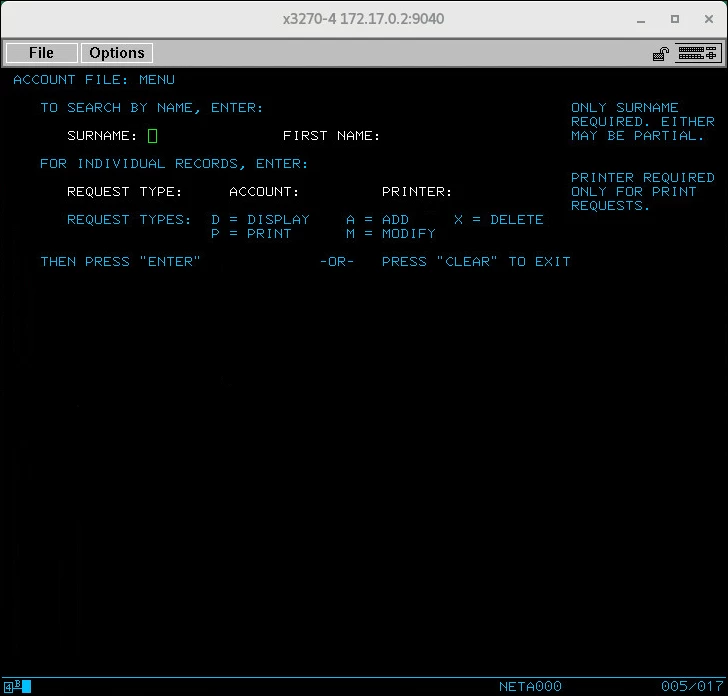
- The demonstration application is a simple application that enables you to add, delete, display, modify, and print records in a data file. You can use the options that are listed on-screen to try it out. Account numbers for records that already exist include 11111 and 2222 if you want to display those.
- With the demonstration application still running, you can use Enterprise Server Administration to connect to and administer the enterprise server that is running in the container:
- Open a browser and specify the following in the address bar:
http://host-name:4790
where host-name is the name of the host where the container is running. This was included in the docker run command that you used to run the demonstration application image, and in this tutorial is nwb-miw-suse. For example:
http://nwb-miw-suse:4790
Enterprise Server Administration starts and looks similar to the following:
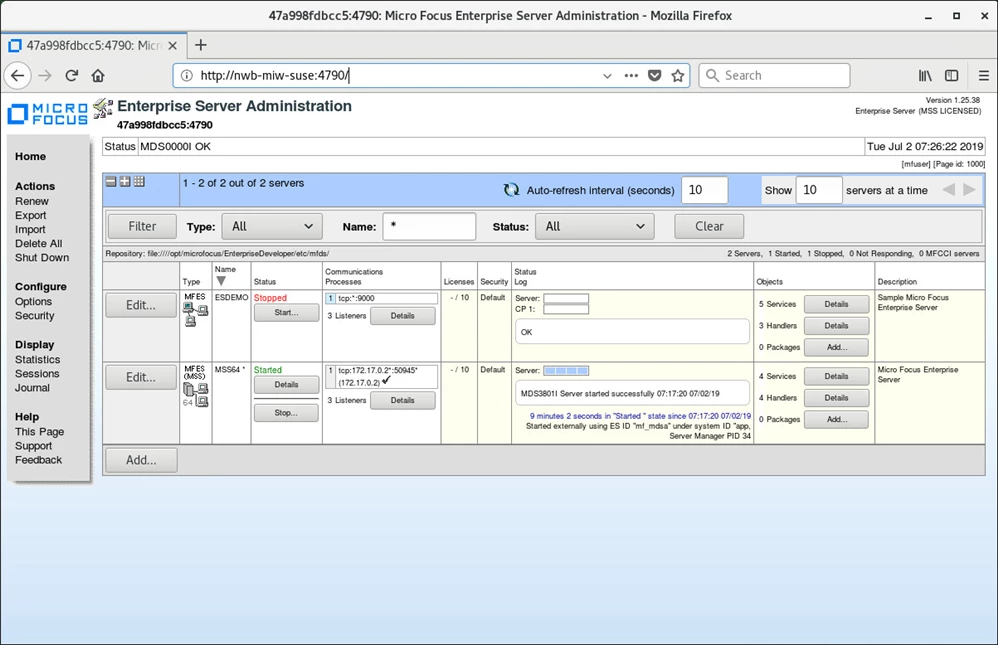
You can see that an enterprise server called MSS64 is running. That is the enterprise server where the ACCT demonstration application is running.
- Use Enterprise Server Administration to investigate the setup of the MSS64 enterprise server as you would with any other enterprise server.
- Open a browser and specify the following in the address bar:
Stop the Demonstration Application and Tidy Up
When you've finished running the demonstration application you need to perform a few steps to stop the application and the container that it is running in.
- From the ACCT demonstration application home screen, clear the screen.
- Enter the following command:
CQIT
The CQIT transaction runs, shutting down the enterprise server that the ACCT demonstration application is running in.
- In Enterprise Server Administration, after a few seconds you can see that the Status column of the MSS64 enterprise server is updated to show Stopped rather than Started.
- From the command prompt, enter the following command to stop the container:
docker stop container-id
For example:
docker stop 47a998fdbcc5
That concludes the tutorial.
The tutorial has shown you how to create an Enterprise Server base image, extend that base image to include a CICS application, run the CICS application in a container, then close down the application and the container. For more information on any of the topics covered by this tutorial, see your Enterprise Server documentation.
#EnterpriseServer
#Enterprise
#Server
#HowTo-BestPractice
